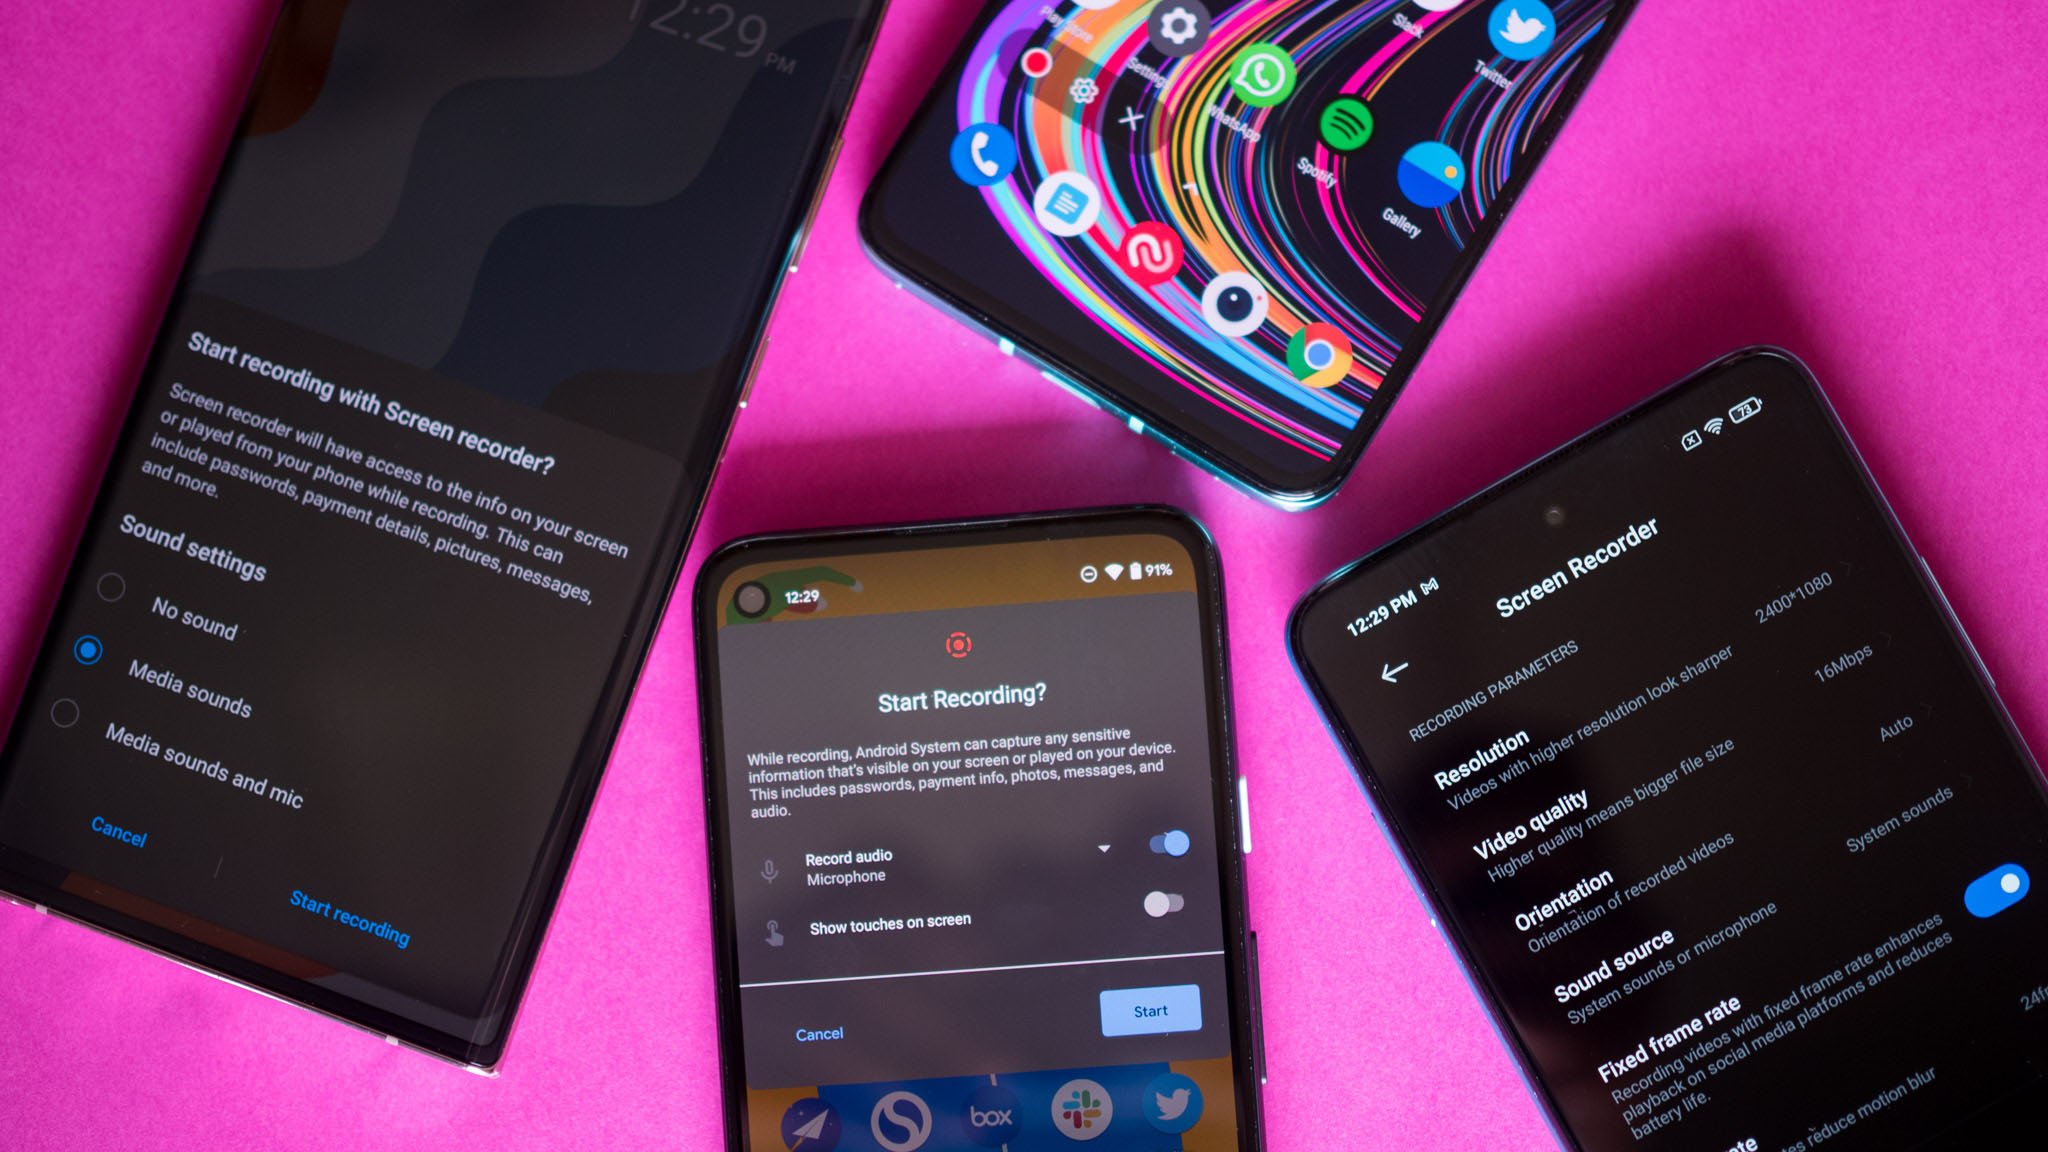
Screenshots are great for sharing information that's on your screen, but if you're trying to highlight a bug or troubleshoot something, screen recording is much more useful. Screen recording is now baked into Android by default, and most third-party manufacturers — including Samsung, Nokia, Motorola, OnePlus, and Xiaomi, — have their own take on the feature. So here's how you can get started with recording your phone screen.
How to record your screen on a Samsung Galaxy phone running One UI
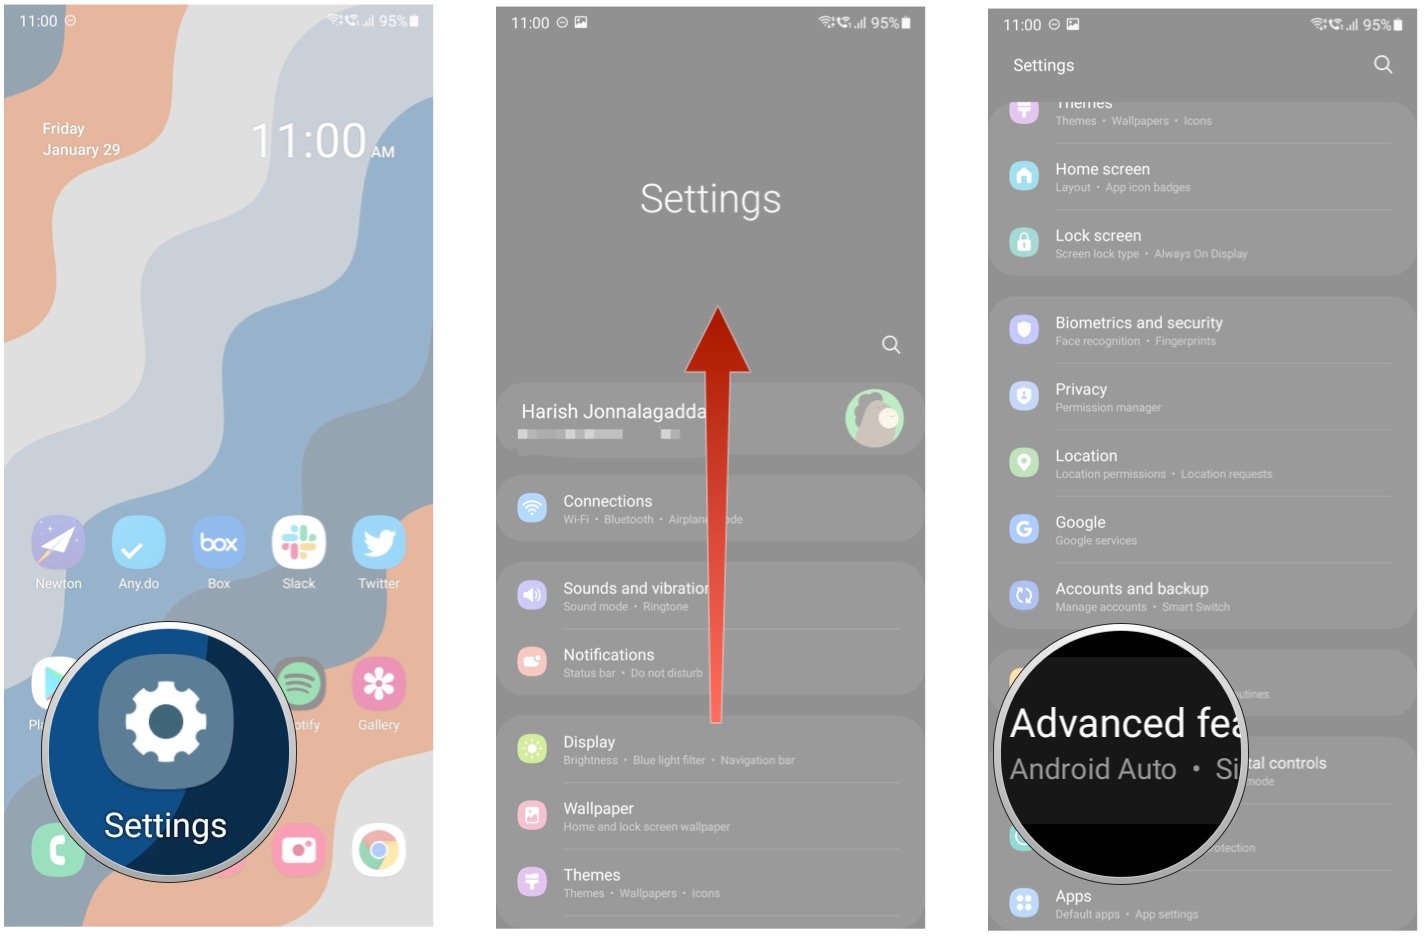
Samsung makes the best Android phones, and with One UI, it offers one of the most feature-rich interfaces on Android. Samsung rolled out native screen recording over a year ago with the One UI 2.0 update, and the feature is now baked into all Galaxy phones. I'm using a Note 20 Ultra running One UI 3.0 for reference, and the steps outlined will be similar if you're on a Galaxy phone running One UI 2.0 and above. Here's how to record your screen on a Samsung Galaxy phone running One UI:
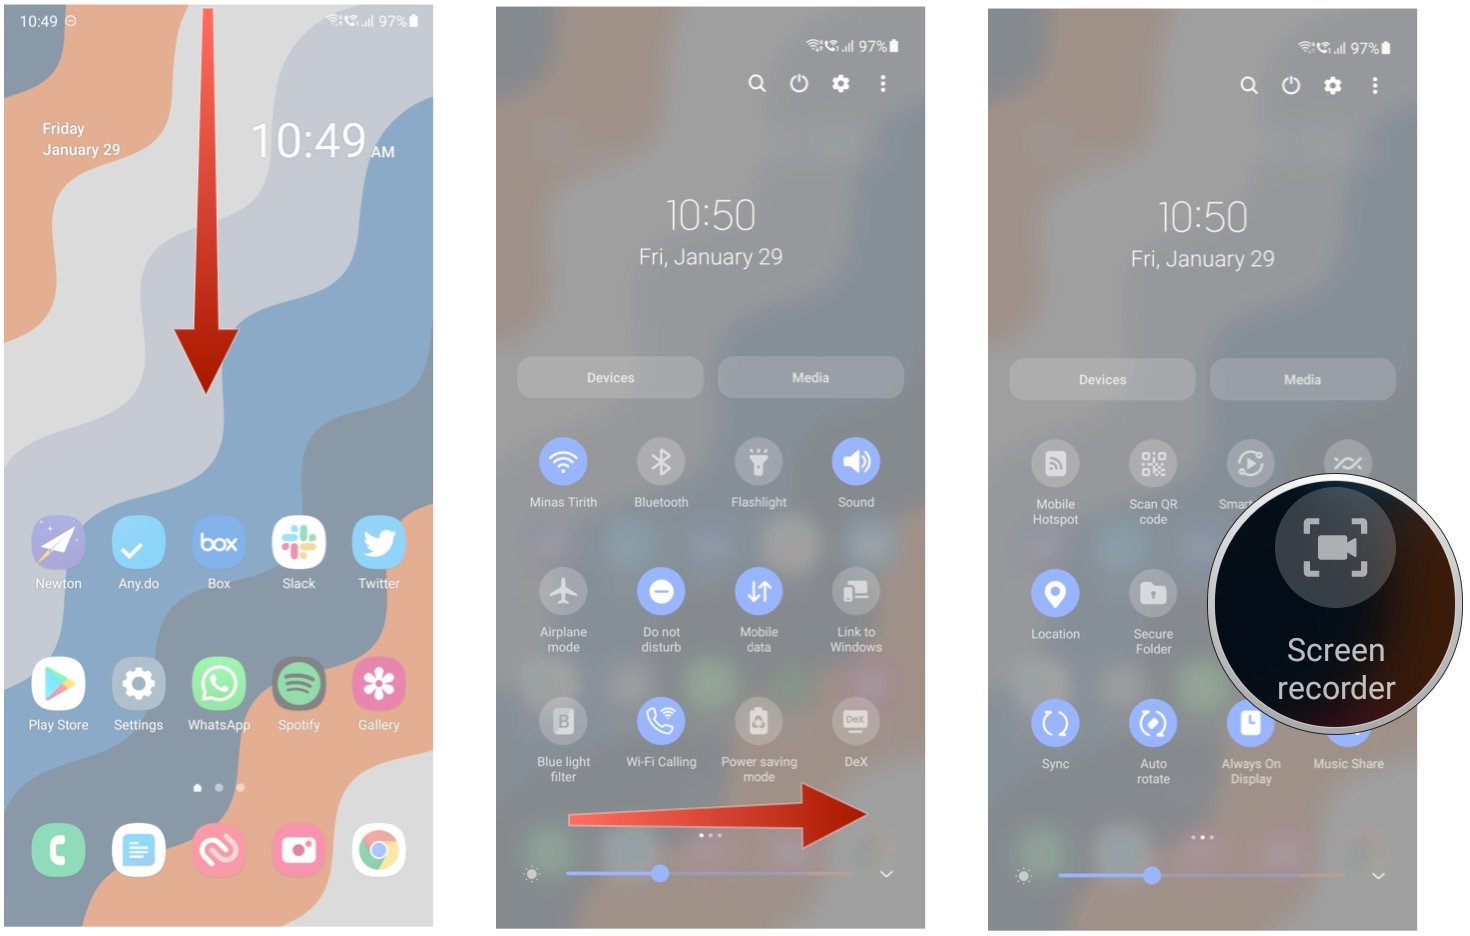
- Pull down the notification shade.
- Pull down once again to reveal all the quick settings tiles.
-
Select the Screen recorder among the quick settings buttons. By default, the Screen recorder button is on the second page, so you may need to swipe over to that page.
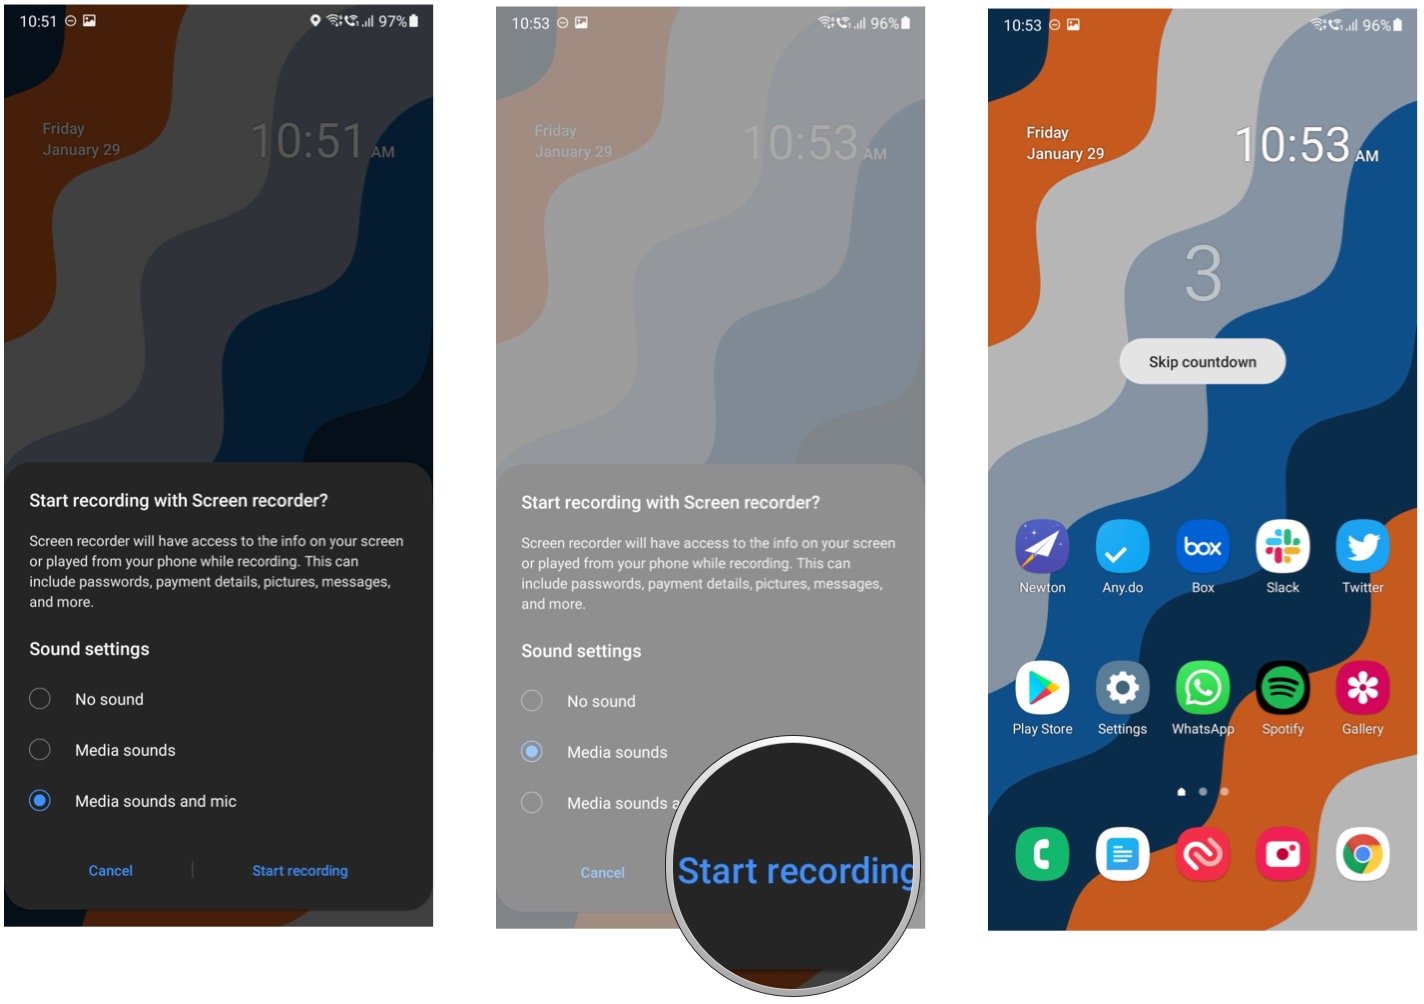
- A dialog box will show up asking what audio you want to record with your screen recording. These are the options:
- No sound: If you don't want any audio with your recording
- Media sounds: If you want to record the sound from your phone's built-in speaker.
- Media sounds and mic: This option is ideal if you're creating a walkthrough and want your audio to be recorded as well.
- Hit Start recording.
-
You'll see a 3-second countdown, and then the recording begins. You can tap Skip countdown to immediately begin recording.
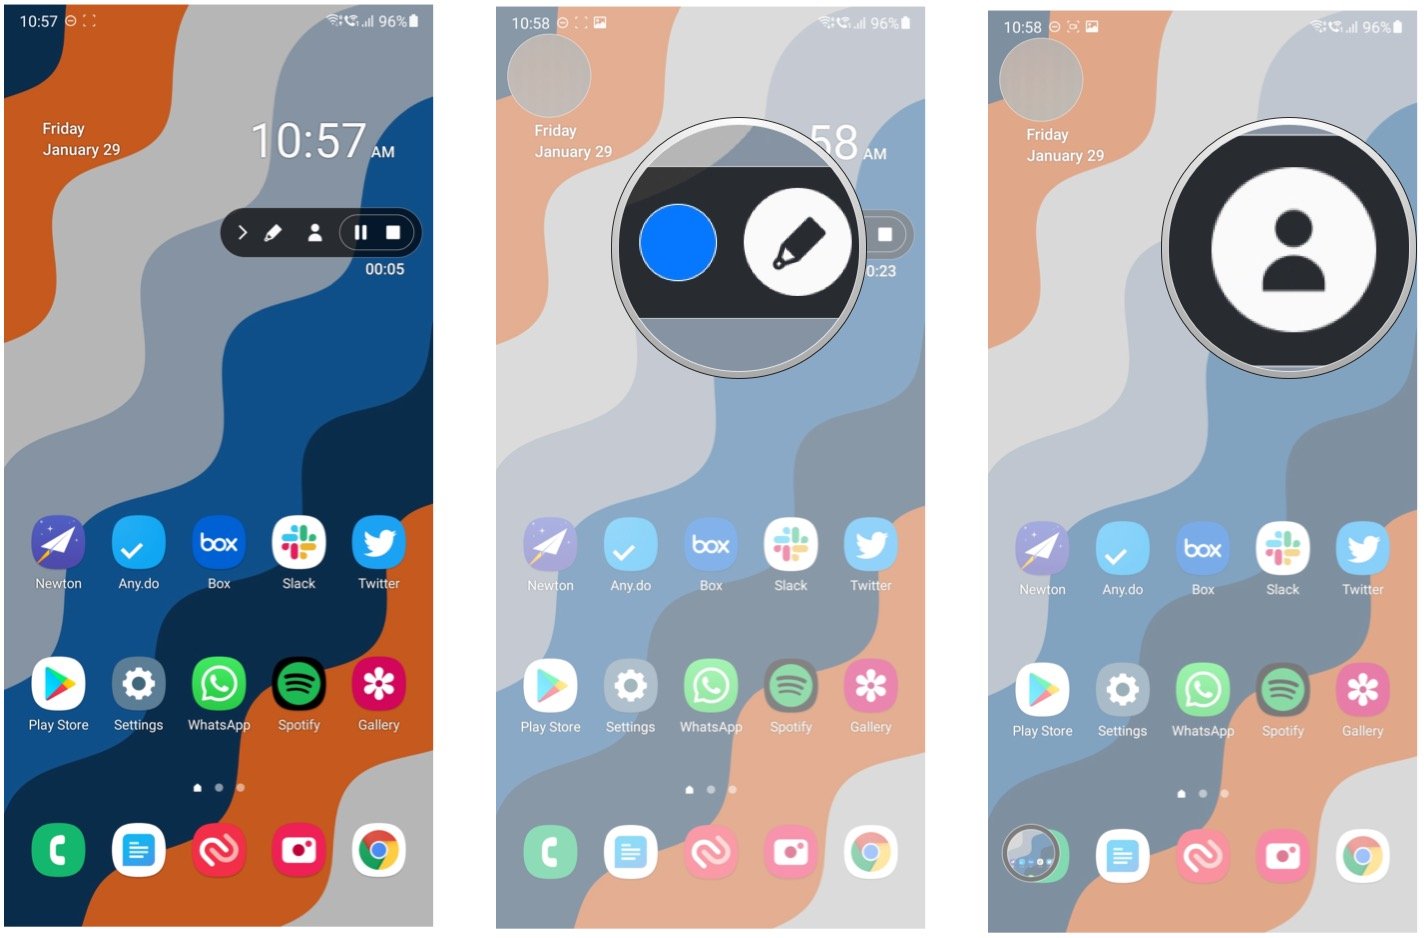
- You'll see a floating widget on the top right corner with a timestamp and pause/stop buttons. You also get the following options:
- Pencil: Use this to annotate the screen. You can annotate in eight colors, and once you tap the pencil again, the annotations disappear.
- Person: Use this to turn on your phone's front camera. You can move the selfie camera's image all around the screen, and you can hit the icon again to remove your video.
-
When you're done, tap the Stop button to end and save the recording. The recording will also automatically end when your screen turns off.
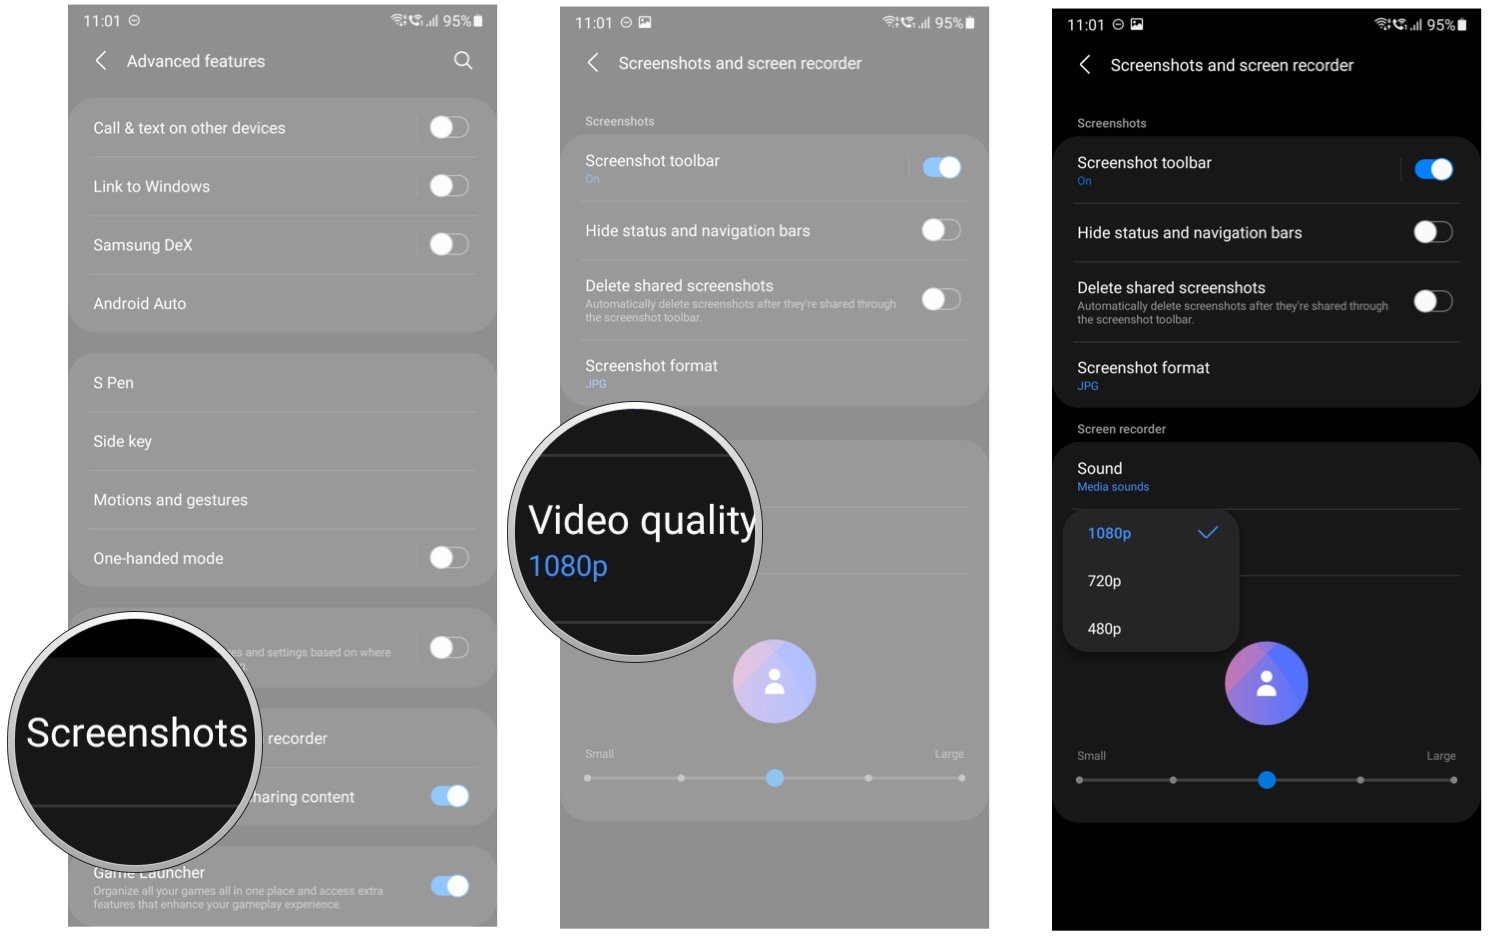
By default, Samsung records screen footage at 1080p, but if you need to turn down the resolution to conserve storage or are looking to tweak additional settings, here's what you need to do:
- Open Settings.
- Scroll down to the bottom of the page.
-
Select Advanced features.
- Select Screenshots and screen recorder.
- Choose Video quality.
-
You can choose from 1080p, 720p, or 480p from here. You can also change the size of the selfie video from here.
That's all there is to it! Samsung doesn't make it easy to change the settings for screen recording, but the feature itself has plenty to offer, and the fact that you have the ability to record your own audio alongside that of the built-in speaker is a great addition.
How to record your screen on a Google Pixel or Android One phone
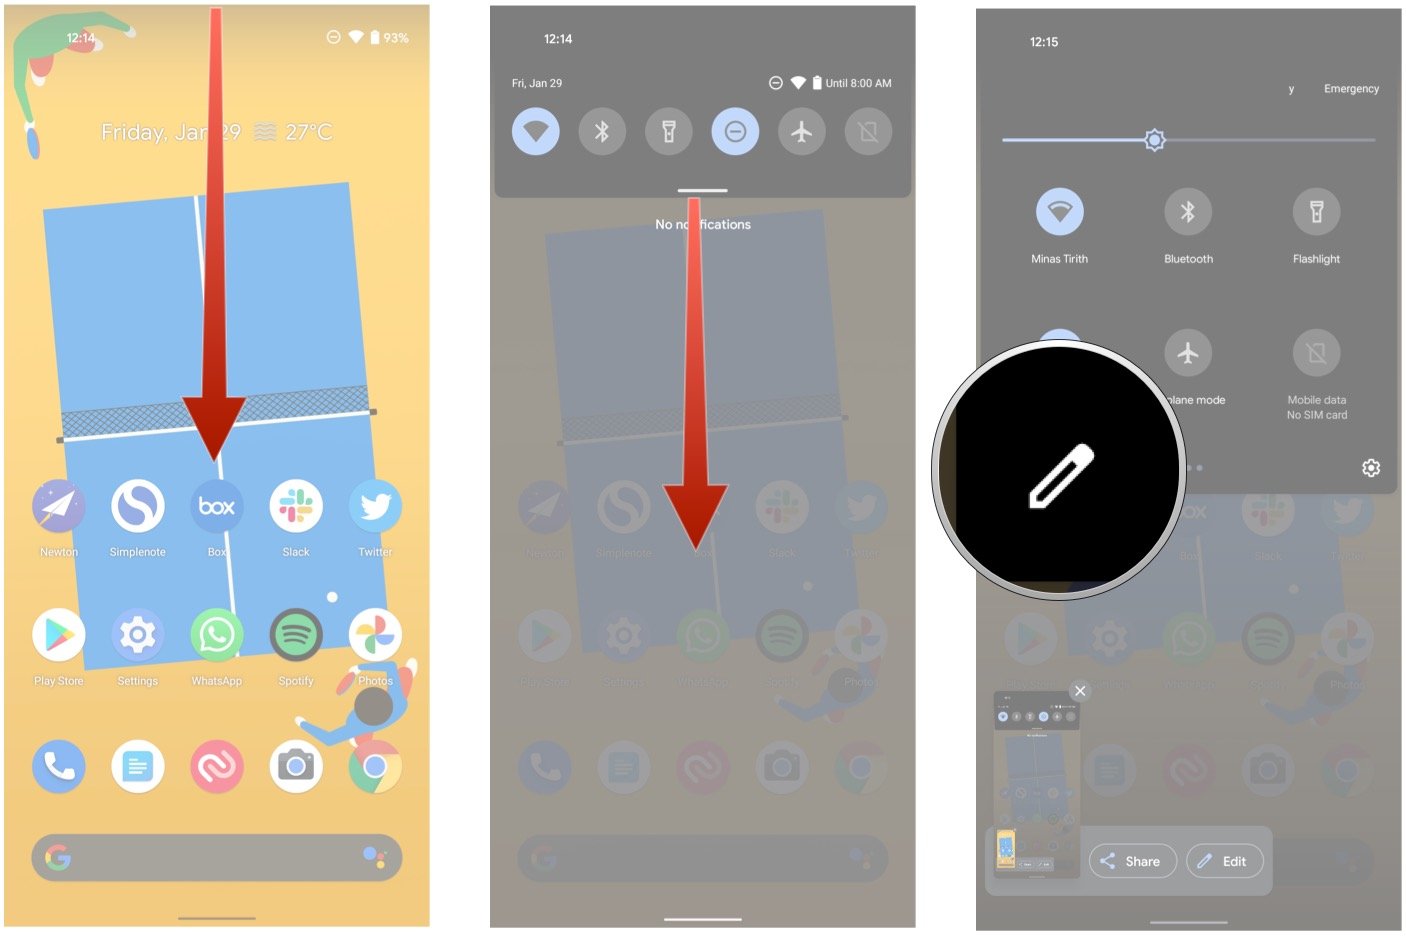
Google introduced native screen recording with Android 11, so if you're using a Pixel phone, you will be able to record the screen without any issues. Android One devices from Nokia and Motorola that have been updated to Android 11 also have the same screen recording option. Here's how to record your screen on a Google Pixel:
- Pull down the notification shade.
- Pull down once again to reveal all the quick settings tiles.
-
Select the Edit icon.
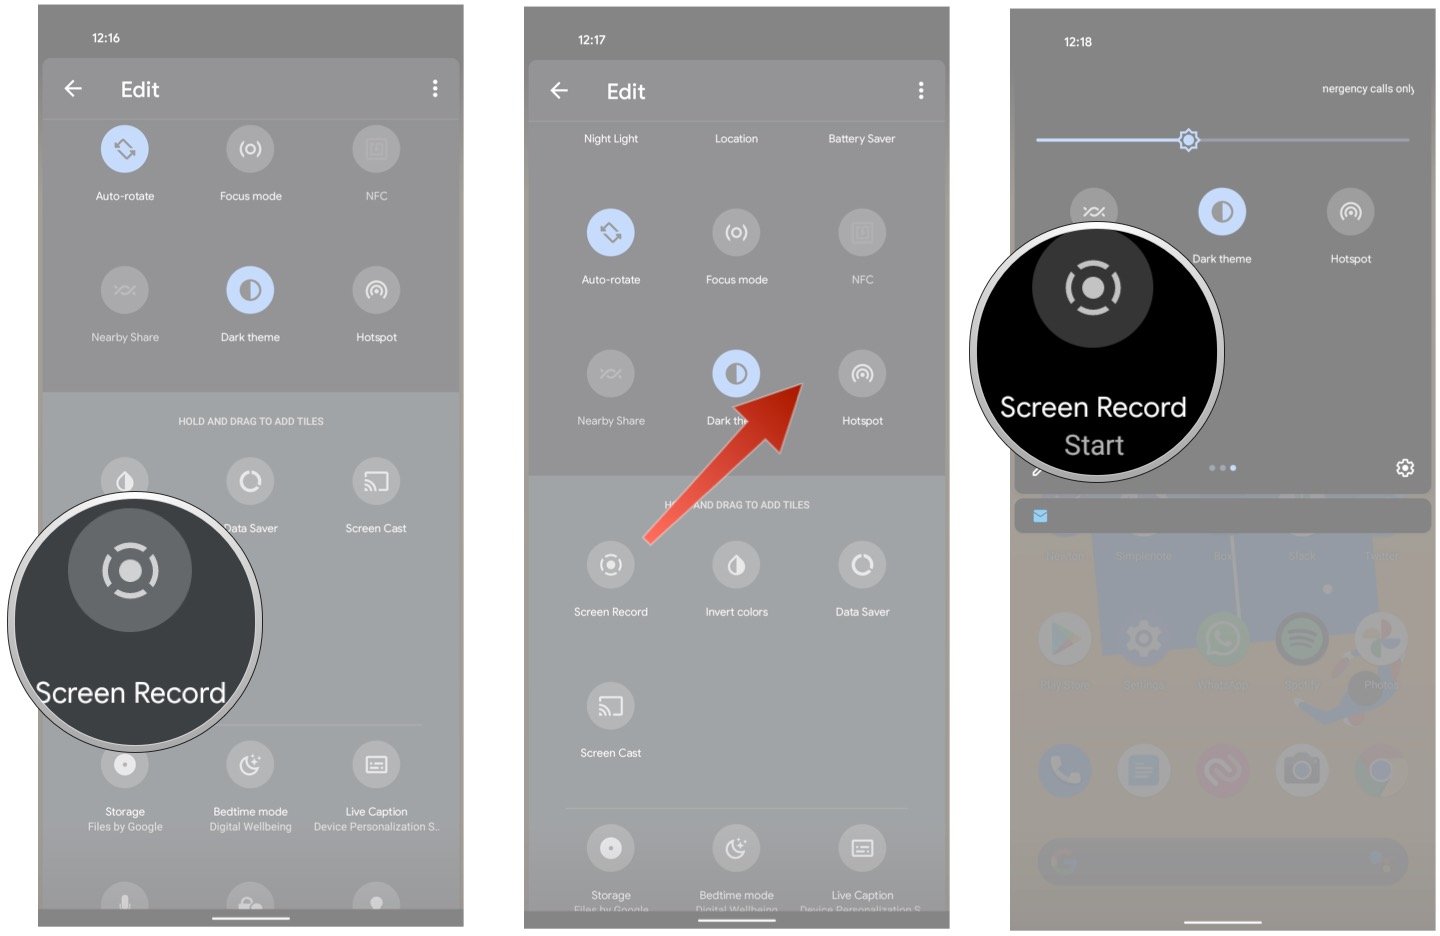
- Locate the Screen Record tile.
- Hold and drag the Screen Record tile to the quick settings pane.
-
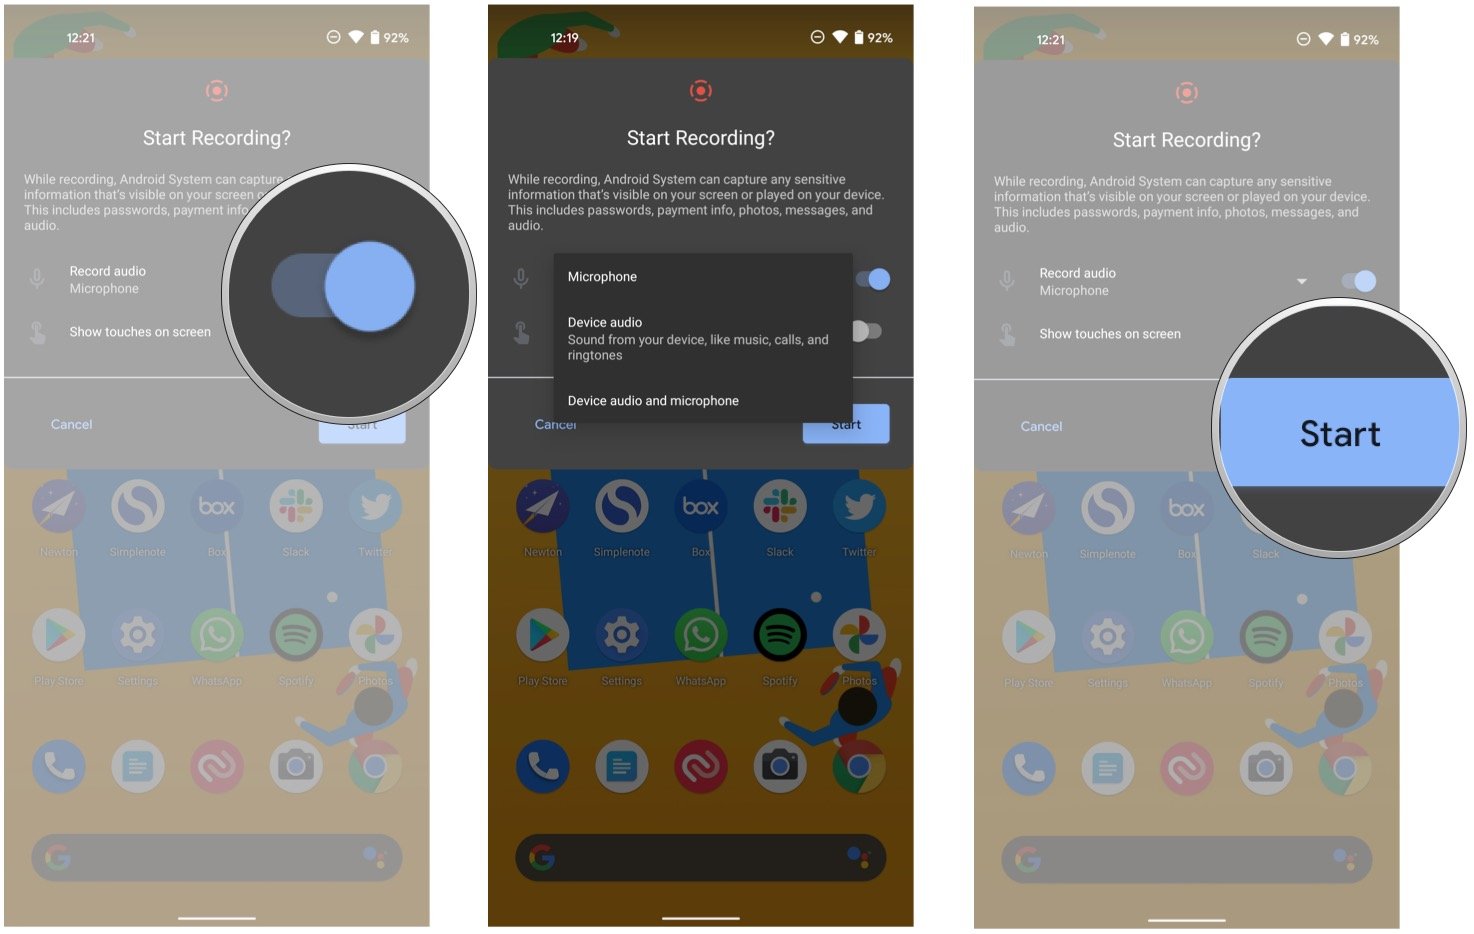
Select the Screen Record tile from the quick settings to start a recording.
- In the dialog box, toggle Record audio to enable audio for your screen recording. You get these options:
- Microphone: Picks up your audio from the device's external mics.
- Device audio: Records sounds from the phone's internal speaker, including ringtones, music, calls, and more.
- Device audio and microphone: Picks up both device audio as well as your voice.
- You also get the ability to show on-screen gestures. Toggle Show touches on screen to enable this feature.
-
Hit Start to start recording your phone's screen.
Recording commences after a 3-second countdown. To end the screen recording, pull down the notification shade and hit End recording. Google doesn't offer too many features here, but the fact that screen recording is built in natively to Android is a big deal in itself.
How to record your screen on a OnePlus phone running OxygenOS
OnePlus rolled out native screen recording nearly two years ago in OxygenOS 9.5, and it offers a comprehensive list of options. I'm using a OnePlus 8T running OxygenOS 11 for the guide, but you'll see the same set of options provided you're on a phone with OxygenOS 9.5 or above. Here's how to record your screen on a OnePlus phone running OxygenOS:
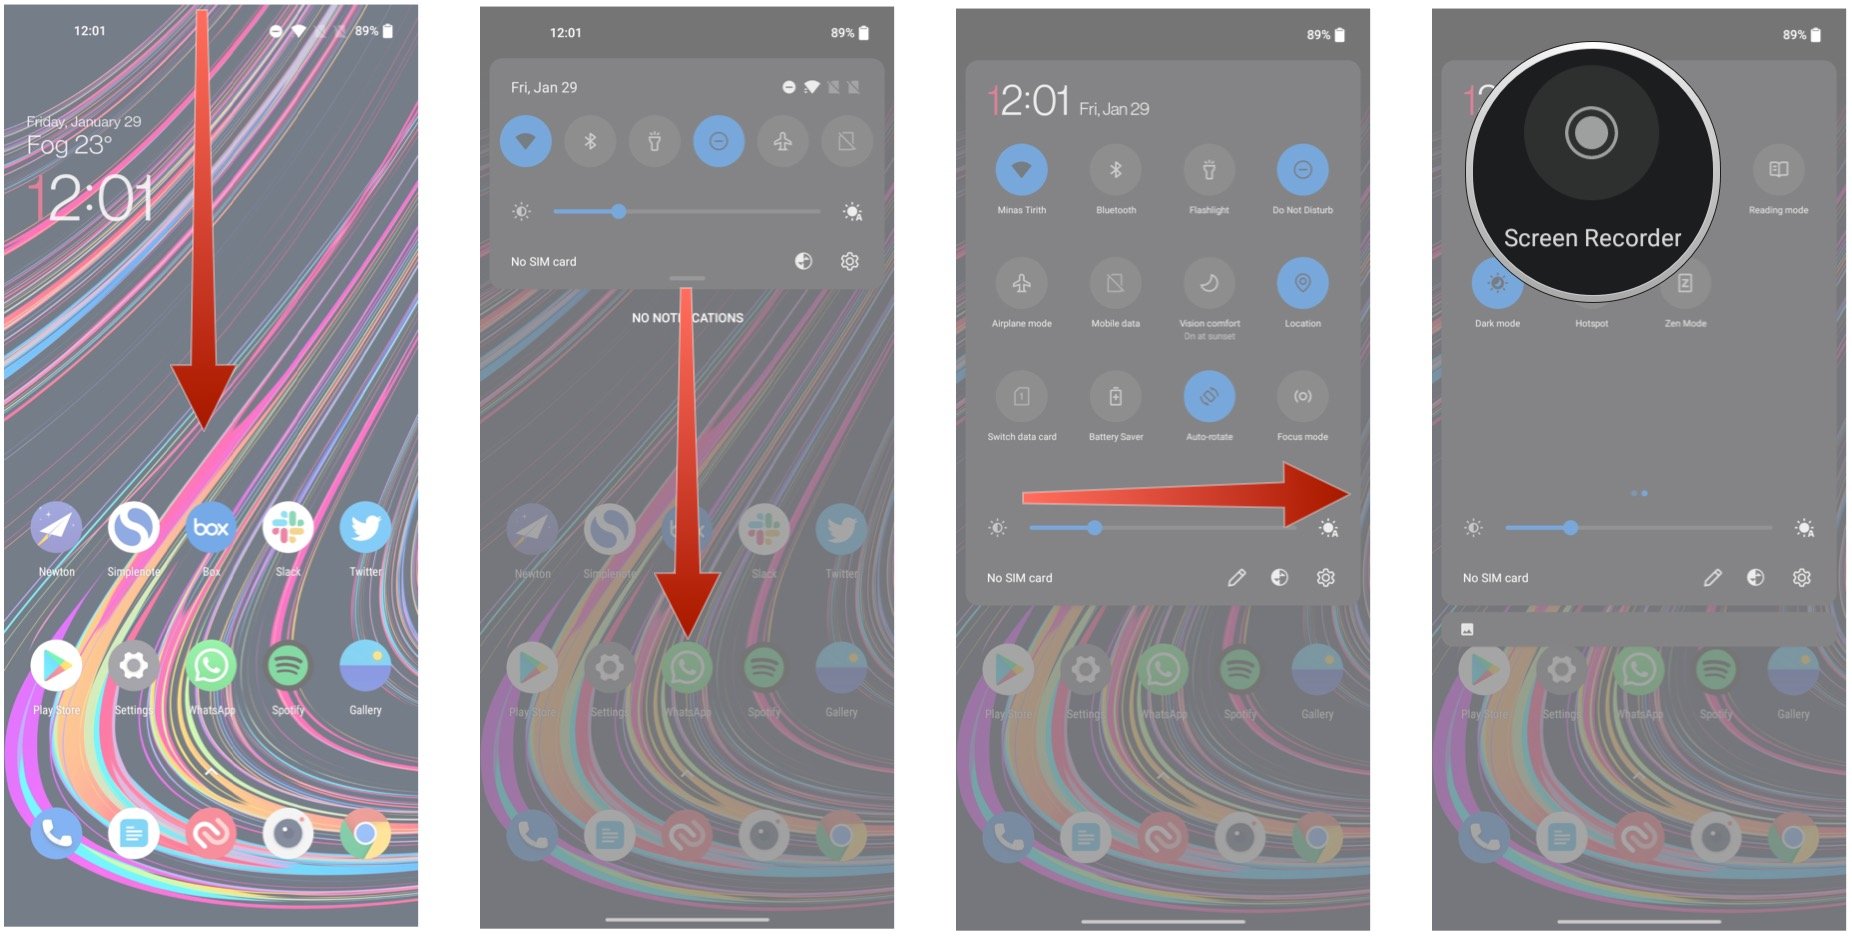
- Pull down the notification shade.
- Pull down once again to reveal all the quick settings tiles.
- Swipe right to go to the next page.
-
Select Screen Recorder.
You will see a floating widget with a record button. You can hit record to start the screen recording, and the widget also has a settings button that lets you customize the settings. These are all the settings you can configure for screen recording in OxygenOS:
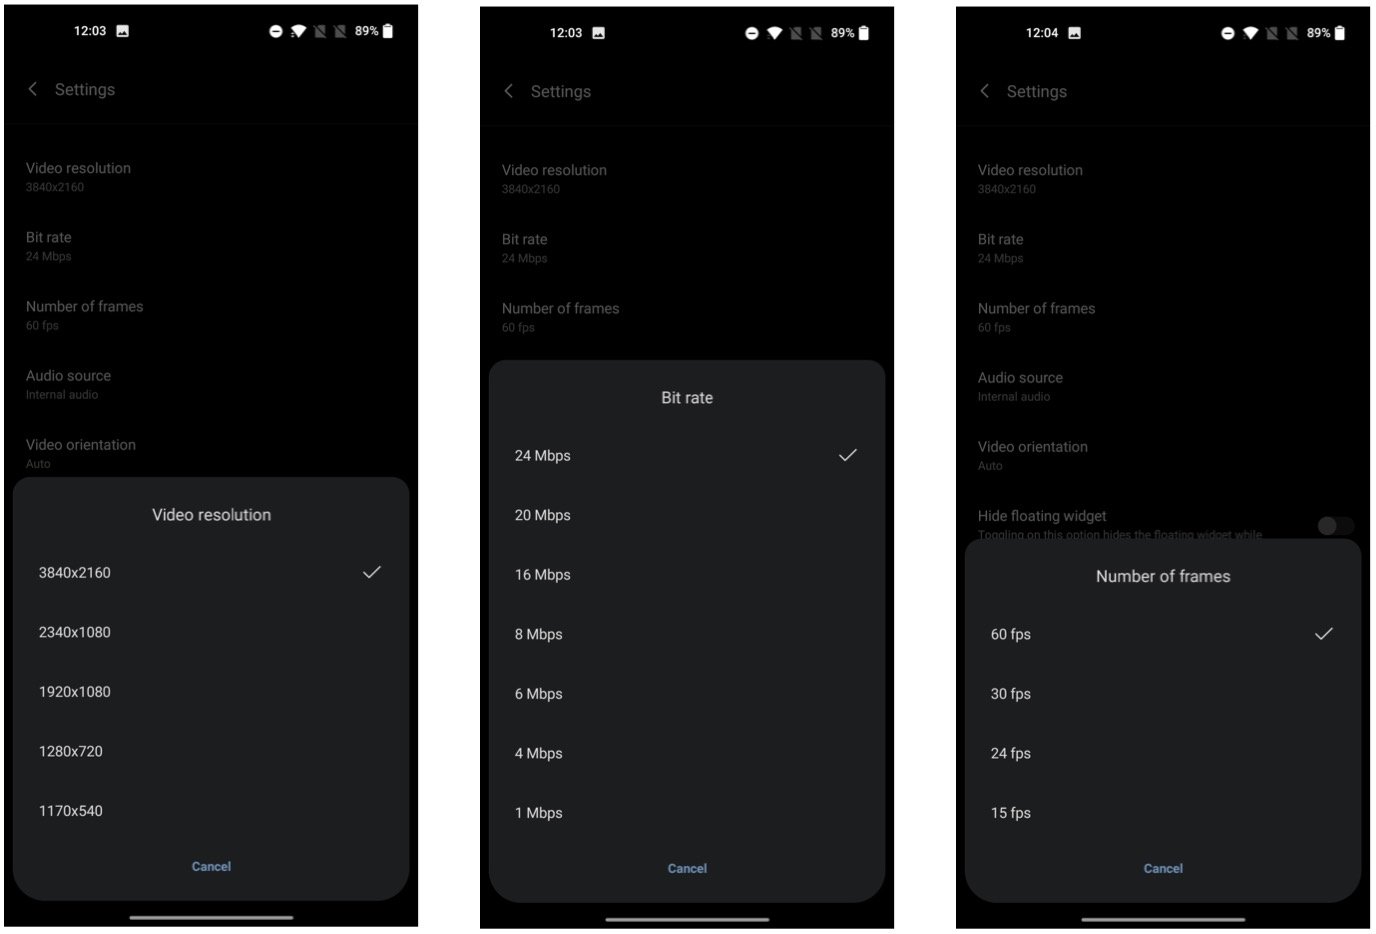
- Video resolution: OnePlus lets you pick five different resolutions for screen recording: 3840x2160, 2340x1080, 1920x1080, 1280x720, and 1170x540. If you're worried about storage, pick a lower resolution.
- Bit rate: The higher the bitrate of the video, the better the quality. The default is 24Mbit, but you can also choose between 20, 16, 8, 6, 4, or even 1Mbit if you want to smaller files.
-
Number of frames: This dictates how smooth your recording will be. The default option is 60fps, but you get to choose between 30, 24, and 15fps.
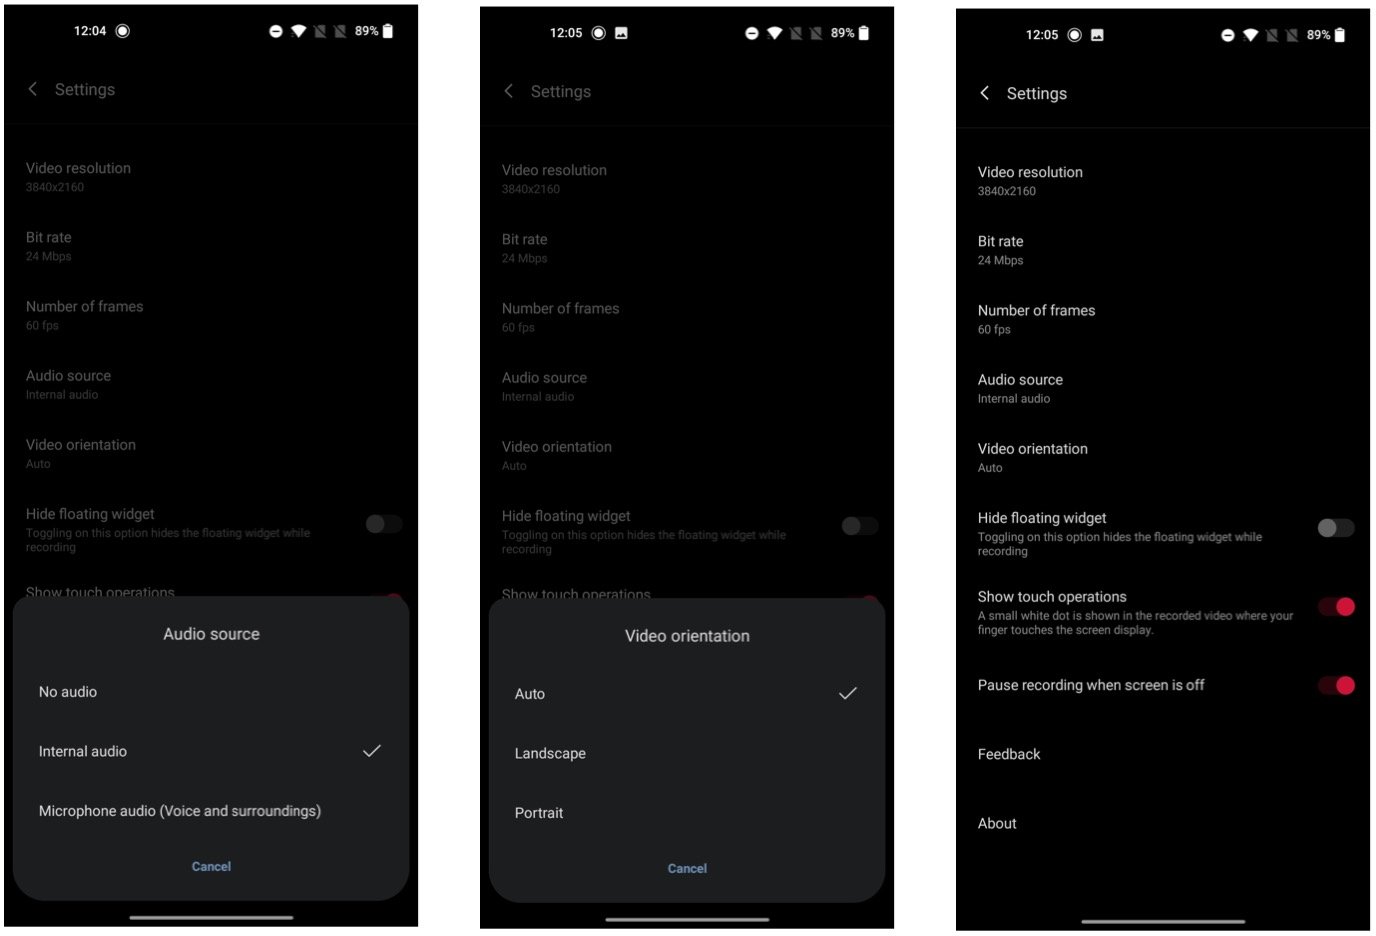
- Audio source: You get the option to record no audio, record audio from the built-in speaker, and a microphone mode that will pick up your voice as well in addition to the phone's built-in audio — which is great for voice-overs.
- Video orientation: If you want to lock the screen recording to portrait, you'll be able to do so here.
- Hide floating widget: You can toggle the floating widget on or off during recording. The widget itself doesn't show up in the resultant video, but if you don't want to be distracted by the menu, you can turn it off.
- Show touch operations: If you're doing a tutorial and need to highlight steps, you should toggle this feature. Doing so will reveal a small white marker wherever your finger touches the screen. This is enabled by default.
-
Pause recording when screen is off: This feature automatically pauses the recording when the screen is locked.
The sheer number of options on offer make screen recording in OxygenOS highly customizable, and if you're looking to make how-to guides or troubleshoot a feature, you will like what OxygenOS has to offer.
How to record your screen on a Xiaomi phone running MIUI
Xiaomi was one of the first Android manufacturers to introduce screen recording. The feature made its debut all the way back in 2017 with MIUI 8, and over the years Xiaomi has added a laundry list of options. I'm using a Mi 10i that's running MIUI 12 for this guide, and while the UI may look different if you're on a Xiaomi phone running an older version of MIUI, you'll find the same set of options. Here's how to record your screen on a Xiaomi phone running MIUI:
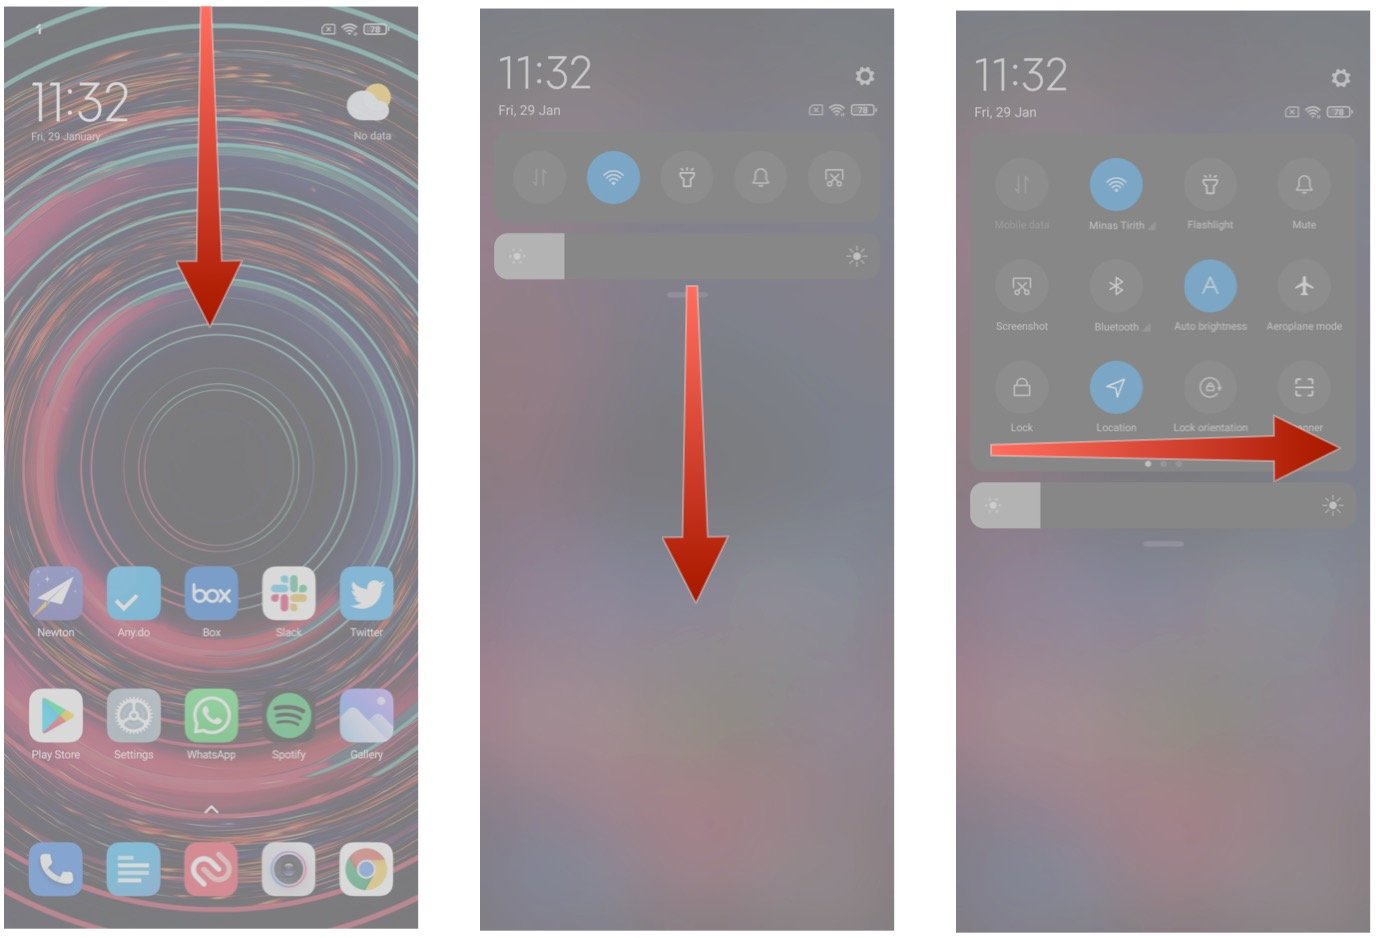
- Pull down the notification shade.
- Pull down once again to reveal all the quick settings tiles.
-
Swipe right to go to the next page.
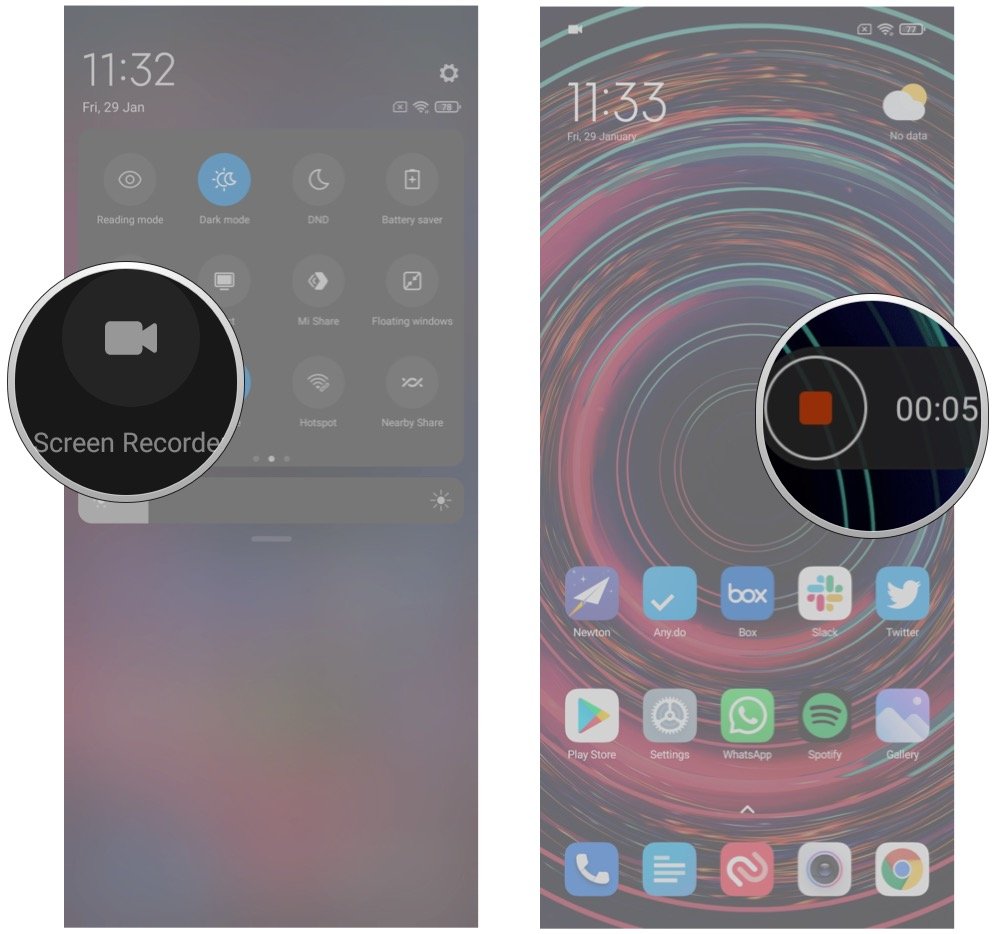
- Select Screen Recorder.
-
You'll see a floating widget with a timestamp and stop button. Hit the stop button to end the screen recording.
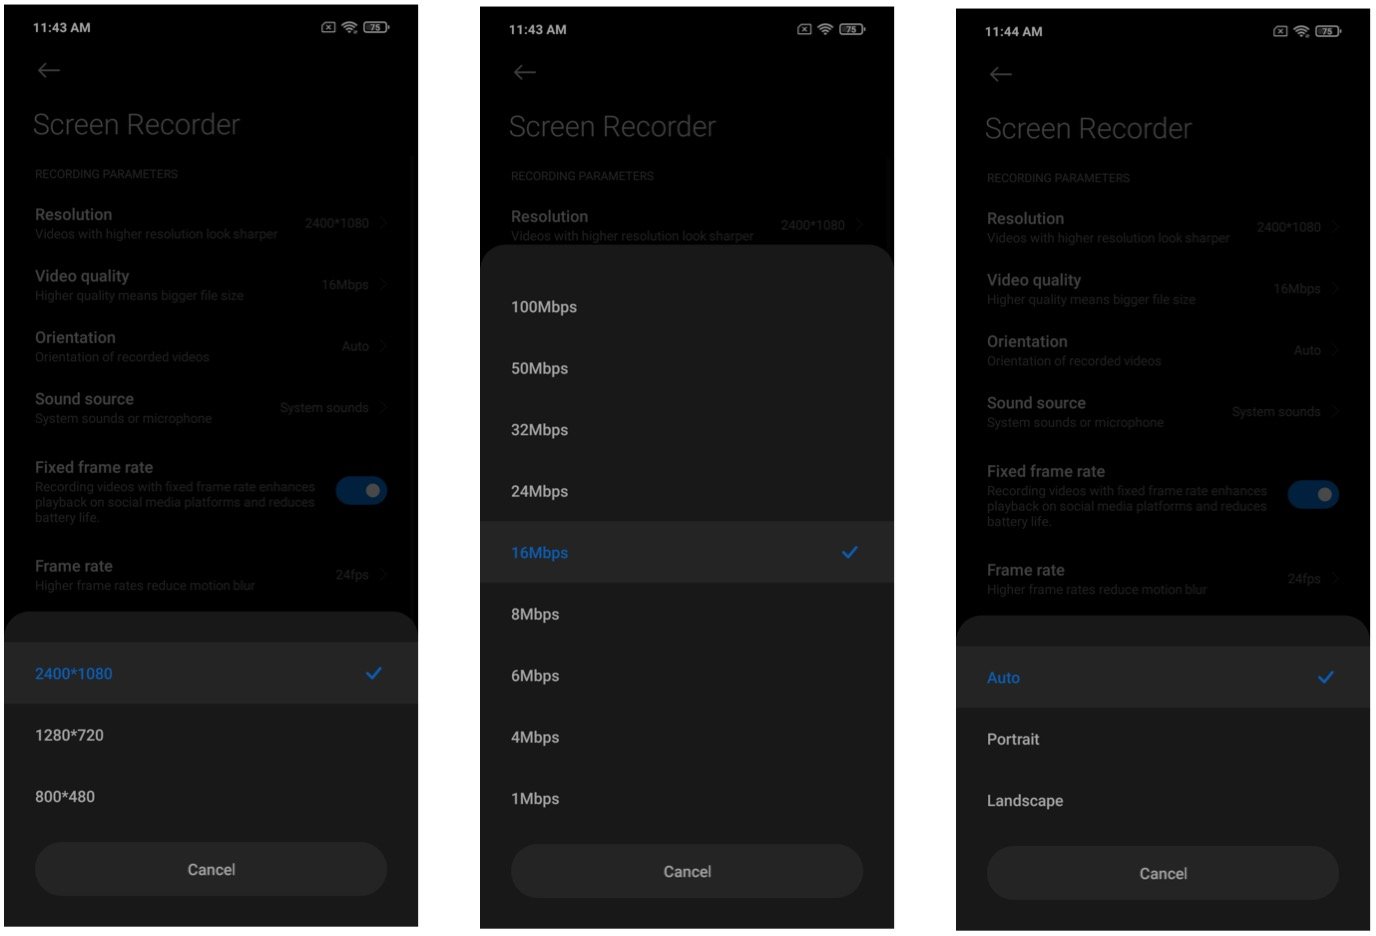
Like Samsung, Xiaomi doesn't make it easy to access the screen recording options. To change the settings, you'll need to open the dedicated Screen Recorder app from the app drawer — it is pre-installed on all Xiaomi devices, so you shouldn't have any issues finding it. Once you open the app, head to the Settings icon in the top right corner. Here you will find the following options:
- Resolution: You have three resolution options to choose from: 2400x1080 is default, and there's also 1280x720 and 800x480.
- Video quality: Xiaomi lets you select the bitrate all the way from 100Mbit to 1Mbit. These are the options available: 100, 50, 32, 24, 16, 8, 6, 4, and 1.
-
Orientation: You can set the orientation to auto or lock it to portrait.
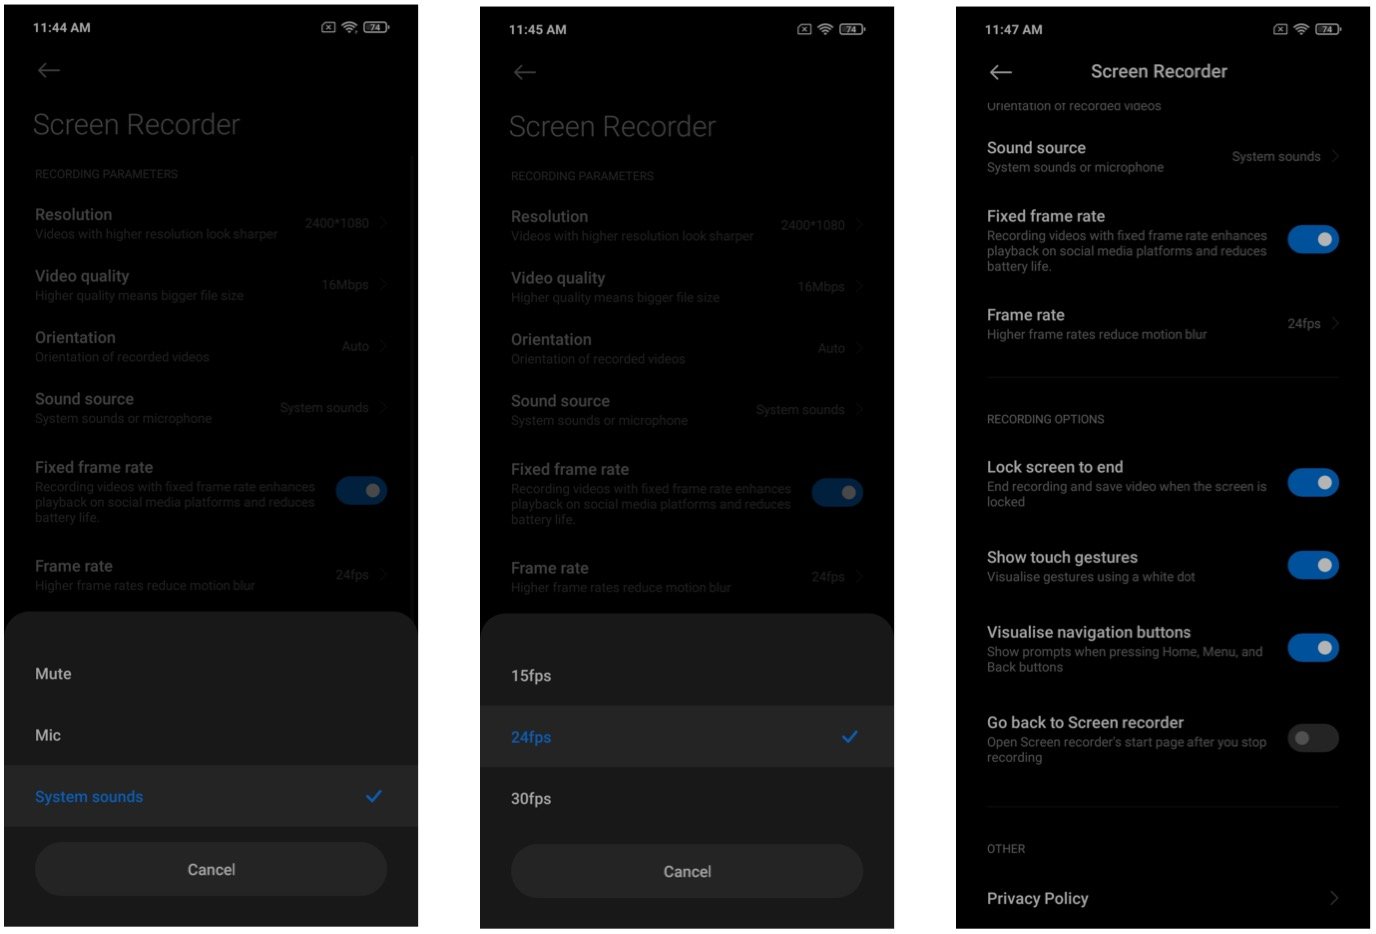
- Sound source: Lets you choose the sounds for your screen recording. MIUI by default uses your phone's internal speaker, but you can also select Mute for no audio or Mic to record your own audio.
- Frame rate: You can set the frame rate for the screen recording from here. You get to choose between 15, 24, and 30fps in MIUI.
- Show touch gestures: You will be able to visualize gestures with an on-screen white dot when this toggle is enabled.
- Lock screen to end: Toggle this if you want to end the recording and save the video by locking your phone.
- Visualize navigation buttons: If you want to show on-screen actions whenever you go back or to the home screen, toggle this option.
-
Go back to Screen recorder: This setting will pull up the Screen Recorder after every recording.
You'll find a lot of similarities between Xiaomi's and OnePlus' screen recording options, but Xiaomi was the first to roll out these options in MIUI.
How to record your screen using a third-party app
All phones running Android 11 have a screen recorder by default, with several manufacturers rolling out their own take before Google got around to adding it natively in Android. But if you're using an older phone and don't have access to screen recording, you'll have to turn to a third-party app to get the job done instead.
Third-party screen recording apps are plentiful, but you'll want to get one that you trust. Screen recorders by their very nature need permissions that can be invasive. It's also worth mentioning that screen recorders had to use workarounds to try and capture the sounds your Android phone makes while recording before Android 10, so recording your phone's audio instead of just the external mic will depend on the app and what version of Android you're running.
Robust features
AZ Screen Recorder
This is the most popular and stable screen recording app around, with options of livestreaming and editing your screen recordings as well as no time limit on screen recordings. You'll need Android 10 to record device audio, but otherwise it's a great screen recorder for recording gameplay or saving bits of a livestream.
Free (with in-app purchases) at Google Play
Award winning
Mobizen Screen Recorder
Mobizen ups the maximum resolution for screen recording to 1440p so that you don't lose any details in your videos, and there's also an option to add in a personalized watermark so that your video is credited when it's shared around.
Free (with in-app purchases) at Google Play
Simplified
Screen Recorder by Kimcy929
This screen recorder isn't as focused on jam-packing every single feature into the app, which makes it a little easier to find your way around it and just get in, start a recording, and get on with your day.
from Android Central - Android Forums, News, Reviews, Help and Android Wallpapers https://ift.tt/3gRYCME
via IFTTT



Aucun commentaire:
Enregistrer un commentaire